프로젝트 정보
프론트엔드 : React
백엔드 : Node.js
DB : MySQL
VS Code 사용
게시판 웹 애플리케이션 만들기
<1. React와 Node.js를 사용한 게시판 웹 애플리케이션 만들기 - 게시판 만들기, 게시글 목록 자동 갱신, 글 추가, Router 설정, CORS 설정, MySQL>
https://tiny-immj.tistory.com/92
1. React와 Node.js를 사용한 게시판 웹 애플리케이션 만들기 - 게시판 만들기, 게시글 목록 자동 갱
Todo구현할 기능 : CRUD(게시글 작성, 조회, 수정, 삭제) RESTful API 이해하기https://tiny-immj.tistory.com/88 REST, REST API, RESTful의 기본 개념과 간단한 api 만드는 방법 진행=> RESTful API는 데이터를 표준화된 방
tiny-immj.tistory.com
<2. React와 Node.js를 사용한 게시판 웹 애플리케이션 만들기 - CRUD 구현, 게시글 수정과 삭제 이벤트, Endpoint>
https://tiny-immj.tistory.com/101
2. React와 Node.js를 사용한 게시판 웹 애플리케이션 만들기 - CRUD API 구현, 게시글 수정과 삭제 이벤
Todo 구현할 기능 : CRUD (게시글 작성, 조회, 수정, 삭제) https://tiny-immj.tistory.com/88 RESTful API 간단한 API 만들기, Postman 사용법~ 포스팅 진행 순서 ~REST, REST APIRESTful설계원칙API 구현하기=> REST, REST API, RE
tiny-immj.tistory.com
React Bootstrap 사용하기 ( + 게시물 조회수 구현)
포스팅 계기
나름 React 게시판을 만든건데 껍데기를 좀 더 신경써보기로 하였다

React Bootstrap을 사용해서 게시판을 보기 좋게 만드는 과정을 정리해보려고 한다
1. React Bootstrap 설치
VS Code에서 REACT-NODE-APP을 오픈
터미널을 열어 React Bootstrap과 Bootstrap의 기본 CSS 파일을 설치한다
npm install react-bootstrap bootstrap
2. Bootstrap 스타일 적용
src/index.js 파일에 Bootstrap의 CSS 파일을 import하여 모든 컴포넌트에 스타일을 적용해준다
import 'bootstrap/dist/css/bootstrap.min.css';
3. React Bootstrap 컴포넌트 종류
사용하고 싶은 컴포넌트 종류와 예시코드 확인은 공식문서에서 확인해볼 수 있다
<React Bootstrap 공식 문서>
https://react-bootstrap.netlify.app/
React Bootstrap | React Bootstrap
The most popular front-end framework, rebuilt for React
react-bootstrap.netlify.app
4. Bootstrap의 Spacing Utility
Bootstrap에서는 margin과 padding을 조절하는 다양한 클래스를 제공하고
페이지 요소 간의 여백을 쉽게 관리할 수 있어 유용하다
예) mt-*, mb-*, my-* 등
mt, mb, my 같은 클래스들을 많이 쓰길래 따로 정리해보았다
4-1. 기본 형식
1) m (margin) / p (padding) 접두사를 사용
2) 방향을 지정하는 접미사
- t : top
- b : bottom
- l : left
- r : right
- x : left + right
- y : top + bottom
- 접미사 없음 : 모든 방향에 적용
3) 크기 값
- 0 : 여백 없음
- 1 : 여백 크기 작게 설정
- 2, 3, 4, 5 : 여백 크기 단계적으로 증가
- auto : 여백을 자동으로 할당
4-2. 예시
- mt-3 : 요소의 위쪽에 3 크기의 여백 추가
- mb-5 : 아래쪽에 5 크기 여백 추가
- my-2 : 요소의 위아래(y) 방향에 2 크기의 여백 추가
- mx-auto : 좌우 여백을 자동으로 설정하여 가운데 정렬
- p-4 : 요소의 모든 방향에 4 크기의 패딩 추가
- px-3 : 요소의 좌우(x 방향)에 3 크기의 패딩 추가
4-3. 자주 쓰는 조합과 예제
1) 자주 쓰는 조합
① 수직 간격이 큰 섹션 : my-5 → 위 아래 여백이 큰 경우
② 상단 간격이 약간 필요한 경우 : mt-2 또는 mt-3
③ 가운데 정렬 : mx-auto (좌우 여백 자동 설정)
④ 버튼 간격 : mr-2 (우측에 여백을 추가해 버튼 간격 조정)
⑤ 박스 안의 패딩 추가 : p-3, px-4, py-2
2) 예제
<div>
    <h1 class="my-3">Hello, World!</h1>
    <p class="mb-2">This is a paragraph with bottom margin</p>
    <button class="btn btn-primary mr-2">Button 1</button>
    <button class="btn btn-secondary">Button 2</button>
</div>
5. 게시판 목록에 Bootstrap 적용 > PostList.js 적용
5-1. 전체 페이지
① 전체 페이지의 위 아래 마진 설정
→ PostList 컴포넌트를 감싸는 <div> 태그에 상하 마진을 적용해준다
방법 : React Bootstrap의 mt-* 및 mb-* 클래스를 사용하거나 인라인 스타일을 적용해주면 됨
<div className="my-5">상단의 <div> 태그에 my-5 클래스를 추가해 페이지 위 아래에 여백을 설정한다
my-5 : Bootstrap에서 위(mt-5)와 아래(mb-5)에 각각 큰 여백을 추가해준다
<h1 className="mt-3">게시판</h1><h1> 태그에 mt-3 클래스를 추가해 상단 여백을 추가로 설정한다
② 전체 컴포넌트 중앙 정렬
→ d-flex justify-content-between align-items-center 사용
<h1>게시판 태그와 글 작성 버튼을 테이블 양쪽 끝으로 배치하고 세로로 중앙 정렬한다
<div className="d-flex justify-content-between align-items-ceonter mb-3">
테이블과 제목, 버튼을 감싸고 있는 div에 width와 margin을 추가해준다
<div style={{ width: '80%', margin: '0 auto' }} className="my-5">
5-2. Table
- Table 컴포넌트를 striped, bordered, hover 속성과 함께 사용해 행 구분이 쉬워지고, 사용자가 행을 선택할 때 강조
- 게시글 정보 표시
index+1을 사용해 테이블의 순번을 표시해준다
posts 배열을 map으로 순회하여 각 게시글의 title, content, created_at 등을 행(tr)에 표시했다
- 테이블 속성 : 전체 div에 적용
width : '80%' 테이블의 너비를 화면의 80프로로 고정한다
margin : '0 auto' 테이블을 화면 중앙에 정렬한다
- 상세보기 링크
Button 컴포넌트와 Link를 결합해 상세보기 버튼을 만들었다
5-3. 현재 모습 확인 및 수정사항 체크

→ 상세보기를 따로 만들지 말고 제목을 클릭했을 때 보여주고 싶다
→ 번호, 제목, 내용, 작성일이 있는 줄에만 색을 넣고 싶다
→ 게시물 조회수 표시
6. 게시물 조회수 구현 및 수정
6-1. 게시물 조회수 구현
→ 글을 클릭한 횟수를 조회할 수 잇는 조회수 기능을 추가해보겠다
현재 1번 포스팅에서 만든 posts 테이블을 사용하고 있다
posts 테이블 생성 참고
CREATE TABLE posts (
	id INT AUTO_INCREMENT PRIMARY KEY,
    title VARCHAR(255),
    content TEXT,
    created_at TIMESTAMP DEFAULT CURRENT_TIMESTAMP
);
▷ TODO : posts 테이블에 'view_cnt' column 값을 새로 생성하고 조회수를 담는다
1) DB에서 칼럼 추가
① MySQL 접속
mysql -u root -pEnter password : 설정한 비번 입력
USE my_database;
② column 추가
ALTER TABLE posts
ADD COLUMN 'view_cnt' INT NOT NULL DEFAULT 0 AFTER 'created_at';
③ 확인
- 특정 테이블의 열 입력
desc 테이블이름;
posts 테이블을 확인해보면 되니까
desc posts;
2) React와 Node.js쪽에서 조회수를 증가시키는 로직 구현
서버 측 API 업데이트 → React에서 조회수 API 호출로 진행
① 서버 측 API 업데이트 (Node.js)
> 조회할 때마다 view_cnt를 증가시키는 로직을 작성한다
> server.js 수정
게시글 상세 정보 API(/api/posts/:id)에 넣어 개별 게시물에 접근할 때마다 호출될 수 있도록 만들어준다

☞ 이렇게 하니까 조회수가 2씩 올라가는 문제가 생겼다!!!
● 쿼리 확인해보기

UPDATE posts SET view_cnt = view_cnt + 1 WHERE id = 2;

select * from posts;
이상이 없다
● 코드 확인하기
▷ 원인 : 클라이언트와 서버의 useEffect와 API 호출 타이밍 문제
1) 조회수 증가 로직의 위치 : GET /api/posts/:id API 호출 시, 조회수를 증가시키고 게시글 정보를 반환한다
2) React의 useEffect 실행 방식 :
PostContent.js에서 PostContent 컴포넌트가 처음 렌더링되면서 useEffect가 실행되어 데이터를 가져온다
리액트의 상태 업데이트 과정에서 컴포넌트가 두 번 렌더링되면 useEffect도 두 번 실행되며 조회수 증가 로직도 두 번 호출된다
작동과정이 state 업데이트 => UI 업데이트 => state 업데이트 => UI 업데이트...
한 번 상태값을 변경할 때 여러번의 렌더링이 연속적으로 발생한다
▷ 해결 방법
- 서버에서 조회수를 증가하는 로직을 별도의 API로 분리해 클라이언트에서 명시적으로 호출하도록 변경
- index.js에서 <React.StrictMode> 태그 주석처리
- <참고> https://tiny-immj.tistory.com/104
React의 UseEffect는 왜 두 번씩 실행되어 빡치게 만드는가
React 게시판을 만들다가 조회수 구현을 하는데 게시글을 클릭할 때 마다 조회수가 두번씩 올랐다 왜 이러는지 이유를 찾아보겠다 React에서 useEffect 실행 방식 useEffect : 리액트 컴포넌트가 렌더링
tiny-immj.tistory.com
▷server.js, index.js, PostContent.js 수정
> server.js

server.js 전체코드
const express = require('express');
const cors = require('cors');	//CORS 패키지 추가
const db - require('./db');
const app = express();

app.use(cors());	// CORS 미들웨어 추가
app.use(express.json());	//JSON 요청을 처리하기 위해 필요

// 게시글 목록 조회 API
app.get('/api/posts', (req, res) => {
	const query = 'SELECT * FROM posts';
    db.query(query, (err, results) => {
    	if (err) {
        	return res.status(500).send('Error fetching posts');
        }
        res.json(results);
    });
});

// 게시글 작성 API
app.post('/api/posts', (req,res) => {
	const { title, content } = req.body;
    const query = 'INSERT INTO posts (title, content) VALUES (?, ?)';
    db.query(query, [title, content], (err, result) => {
    	if (err) {
        	return res.status(500).send('Error creating post');
        }
        res.status(201).send('Post created successfully');
    });
});

// 게시글 상세 정보 가져오기
app.get('/api/posts/:id', (req, res) => {
	const { id } = req.params;

    // 게시글 정보 가져오기
    db.query('SELECT * FROM posts WHERE id = ?', [id], (err, results) => {
    	if (err) {
        	console.error(err);
            return res.status(500).json({ message: '서버 오류' });
        }
    	if (results.length === 0) {
        	return res.status(404).json({ message: '게시글을 찾을 수 없습니다' });
        }
        console.log('### 게시글 조회 성공: ${results[0]}');
        res.json(results[0]);
    });
});

// 조회수 증가 API 생성
app.patch('/api/posts/:id/view', (req, res) => {
	const { id } = req.params;

    db.query('UPDATE posts SET view_cnt = view_cnt + 1 WHERE id = ?', [id], (err) =>{
    	if (err) {
    		console.error('조회수 증가 오류:', err);
        	return res.status(500).json({ message: '서버 오류' });
   		 }
    	res.status(200).send('조회수 증가 성공');
    });
});


// 게시글 수정 API
app.put('/api/posts/:id', (req, res) => {
	const { id } = req.params;
	const { title, content } = req.body;
    const query = 'UPDATE posts SET title = ?, content = ? WHERE id = ?';
    db.query(query, [title, content, id], (err, results) => {
		if (err) {
        	return res.status(500).send('Error updating post');
        }
        res.send('Post updated successfully')
	});
});

// 게시글 삭제 API
app.delete('/api/posts/:id', (req,res) => {
	const { id } = req.params;
    const query = 'DELETE FROM posts WHERE id = ?';
    db.query(query, [id], (err, result) => {
    	if (err) {
        	return res.status(500).send('Error deleting post');
        }
        res.send('Post deleted successfully');
    });
});

// 서버 실행
const PORT = 5001;
app.listen(PORT, () => {
	console.log('Server running on http://localhost:${PORT}');
});
>index.js

import React from 'react';
import ReactDOM from 'react-dom/client';
import './index.css';
import App from './App';
import reportWebVitals from './reportWebVitals';
import 'bootstrap/dist/css/bootstrap.min.css';

const root = ReactDOM.createRoot(document.getElementById('root'));
root.render(
	// <React.StrictMode>	//조회수 2번씩 증가 해결
	<App />
    // </React.StrictMode>
	);

	// If you want to start measuring performance in your app, pass a function
    // to log results (for example: reportWebVitals(console.log))
    // or send to an analytics endpoint. Learn more: https://bit.ly/CRA-vitals
    reportWebVitals();
② React에서 조회수 API 호출
게시물 상세 페이지(PostContent.js)를 열 때, 조회수 API를 호출한다
React 컴포넌트에서 API로부터 데이터를 가져오면서 조회수를 업데이트 한다
>PostList.js

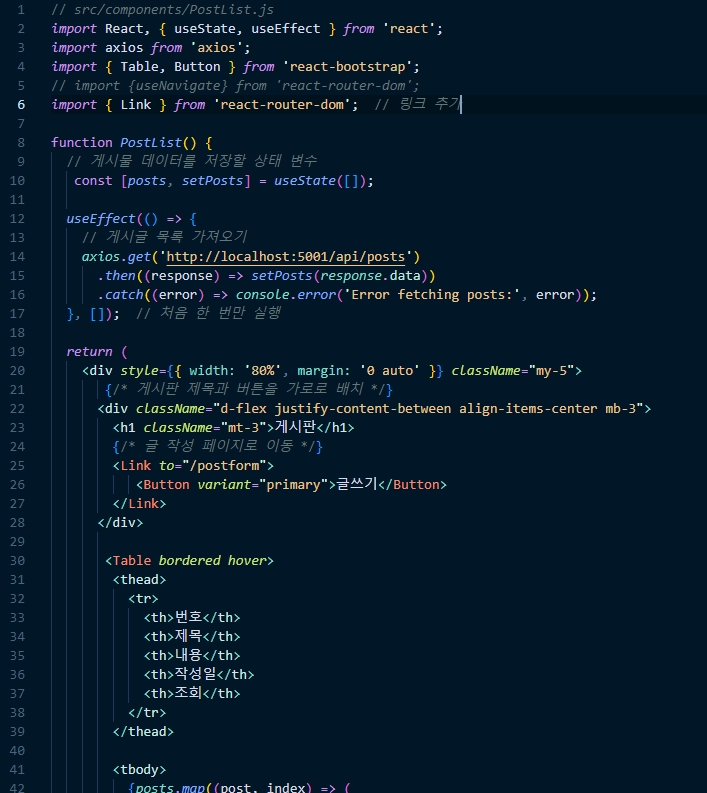
전체코드
// src/components/PostList.js
import React, { useState, useEffect } from 'react';
import axios from 'axios';
import { Table, Button } from 'react-bootstrap';
// import {useNavigate} from 'react-router-dom';
import { Link } from 'react-router-dom';	// 링크 추가

function PostList() {
	// 게시물 데이터를 저장할 상태 변수
	const [posts, setPosts] = useState([]);

    useEffect(() => {
    // 게시글 목록 가져오기
    	axios.get('http://localhost:5001/api/posts')
        	.then((response) => setPosts(response.data))
    		.catch((error) => console.error('Error fetching posts:', error));
    }, []);	// 처음 한 번만 실행

    return (
    <div style={{ width:'80%', margin: '0 auto' }} className="my-5">
    	{/* 게시판 제목과 버튼을 가로로 배치 */}
        <div className="d-flex justify-content-between align-items-center mb-3">
        	<h1 className="mt-3">게시판</h1>
            {/* 글 작성 페이지로 이동 *}
            <Link to="/postform">
            	<Button variant="primary">글쓰기</Button>
            </Link>
        </div>

        <Table bordered hover>
        	<thead>
            	<tr>
                	<th>번호</th>
                    <th>제목</th>
                    <th>내용</th>
                    <th>작성일</th>
                    <th>조회</th>
                </tr>
            </thead>

            <tbody>
            	{posts.map((post, index) => (
                	<tr key={post.id}>
                        <td>
                            <Link to={'/post/${post.id}'}>
                                {post.title}
                            </Link>
                        </td>
                        <td>{post.content}</td>
                        <td>{new Date(post.created_at).toLocaleDateString()}</td>
                        <td>{post.view_cnt}</td>
                    </tr>
                )) }
            </tbody>
        </Table>
    </div>
    );
}

export default PostList;
>PostContent.js

//PostContent.js
import React, { useEffect, useState } from 'react';
import { useParams, useNavigate } from 'react-router-dom';
import { deletePost } from '../share/api';	// api.js에서 함수 불러오기
import axios from 'axios';
import { Link } from 'react-router-dom';	//링크 추가

const PostContent = () => {
	const { id } = useParams();
    const navigate = useNavigate();	//navigate 변수 선언
	const [post, setPost] = useState(null);

    useEffect(() => {
    // 게시글 데이터 가져오기
    console.log("### useEffect 실행됨");
    axios.get('http://localhost:5001/api/posts/${id}')
    	.then(response => {
        	setPost(response.data);

            // 조회수 증가 API 호출
            console.log("### 조회수 증가 API 호출");
            axios.patch('http://localhost:5001/api/posts/${id}/view')
            	.catch(error => console.error('조회수 증가 오류:', error));
        })
        .cathc(error => console.error('게시글 불러오기 오류:', error));
    }, [id]);

    if (!post) return <div>로딩 중...</div>

    // 수정 함수
    const handleEdit = () => {
    	// 수정 페이지로 이동하는 함수
        navigate('/edit/${id}');

    };

        // 삭제 함수
        const handleDelete = async () => {
        const result = await deletePost(id);
    	if (result.success) {
        	alert('Post deleted successfully');
            navigate('/');
        } else {
        	alert(result.error || 'Failed to delete post');
        }
    };


    return (
    	<div>
        	<h2>{post.title}</h2>
            <p>{post.content}</p>
            <p><strong>조회수:</strong> {post.view_cnt}</p> {/* 조회수 표시 */}
            <p><strong>작성일:</strong> {new Date(post.created_at).toLocaleString()}</p>
            {/* 버튼 추가 */}
            <button onClick={handleEdit}>Edit</button>
            <button onClick={handleDelete}>Delete</button>
            <div>
            	<Link to={"/"}>
                	게시글 목록
                </Link>
            </div>
        </div>
    );
};

export default PostContene;
7. Bootstrap 나머지 적용하기
7-1. 게시판 글쓰기 Bootstrap 적용
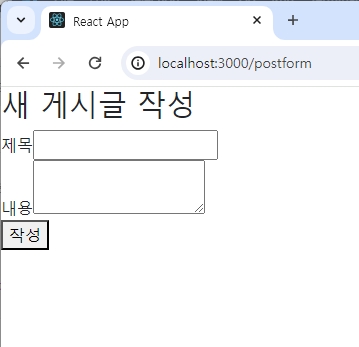
> PostForm.js
현재 모습

Bootstrap의 Grid 시스템 활용하기

▷Container 추가 :
부트스트랩의 Container 컴포넌트로 전체 레이아웃을 중앙 정렬하고 폭을 제한했다
▷Row와 Col 사용 :
Row는 행을 생성하고 각 Col로 열을 나눈다
▷Form.Control 활용 :
Form.Control을 사용하여 일관된 입력 스타일을 제공한다
▷정렬 :
text-end 클래스를 사용해 버튼을 오른쪽 정렬
▷플레이스 홀더 추가 :
입력필드에 placeholder 속성을 추가했다
* PostForm.js 전체 코드
import React, { useState } from 'react';
import axios from 'axios';
import { useNavigate } from 'react-router-dom';
import { Row, Col, Form, Button, Container } from 'react-bootstrap';

function PostForm({ setPosts }) {
	const [title, setTitle] = useState('');
    const [content, setContent] = useState('');
    const navigate = useNavigate();

    const handleSubmit = (e) => {
    	e.preventDefault();

        axios.post('http://localhost:5001/api/posts', {title, content })
        	.then((response) => setPosts(response.data))
            .catch((error) => console.error('Error fetching posts:', error));

        	navigate('/');
        })
   		 .catch((error) => console.error('Error creating post:', error));
    };

    return (
    	<Container style={{ maxWidth: '800px', marginTop: '50px' }}>
        	<h2 className="mb-5">새 게시글 작성</h2>
            <form onSubmit={handleSubmit}>
            {/* 제목 입력 */}
            	<Row className="mb-3">
                	<Form.Label>제목</Form.Label>
                	<Col md={10}>
                    	<Form.Control
                        	type="text"
                            value={title}
                            onChange={(e) => setTitle(e.target.value)}
                            placeholder="제목을 입력하세요"
                        />
                    </Col>
                </Row>

                {/* 내용 입력 및 버튼 */}
                <Row className="mb-4 align-items-center">
                	<Form.Label>내용</Form.Label>
                	<Col md={10} className="position-relative">
                    	<Form.Control
                        	as="textarea"
                            rows={15}
                            value={content}
                            onChange={(e) => setContent(e.target.value)}
                            placeholder="내용을 입력하세요"
                            style={{ paddingRight: '100px' }}
                        />
                        {/* 버튼을 textarea 왼쪽 아래에 위치 */}
                        <Button
                        	className='mt-3'
                            variant="primary"
                            type="submit"
                            style={{
                            	bottom: '10px',
                                right: '10px',
                        }}>작성
                        </Button>
                    </Col>
                </Row>
            </form>
        </Container>
    );
}

export default PostForm;
7-2. 게시판 글 상세 Bootstrap 적용
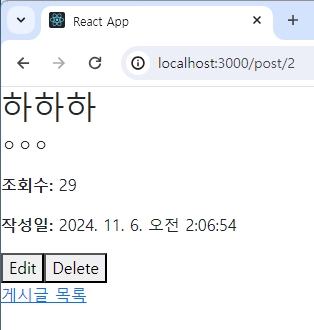
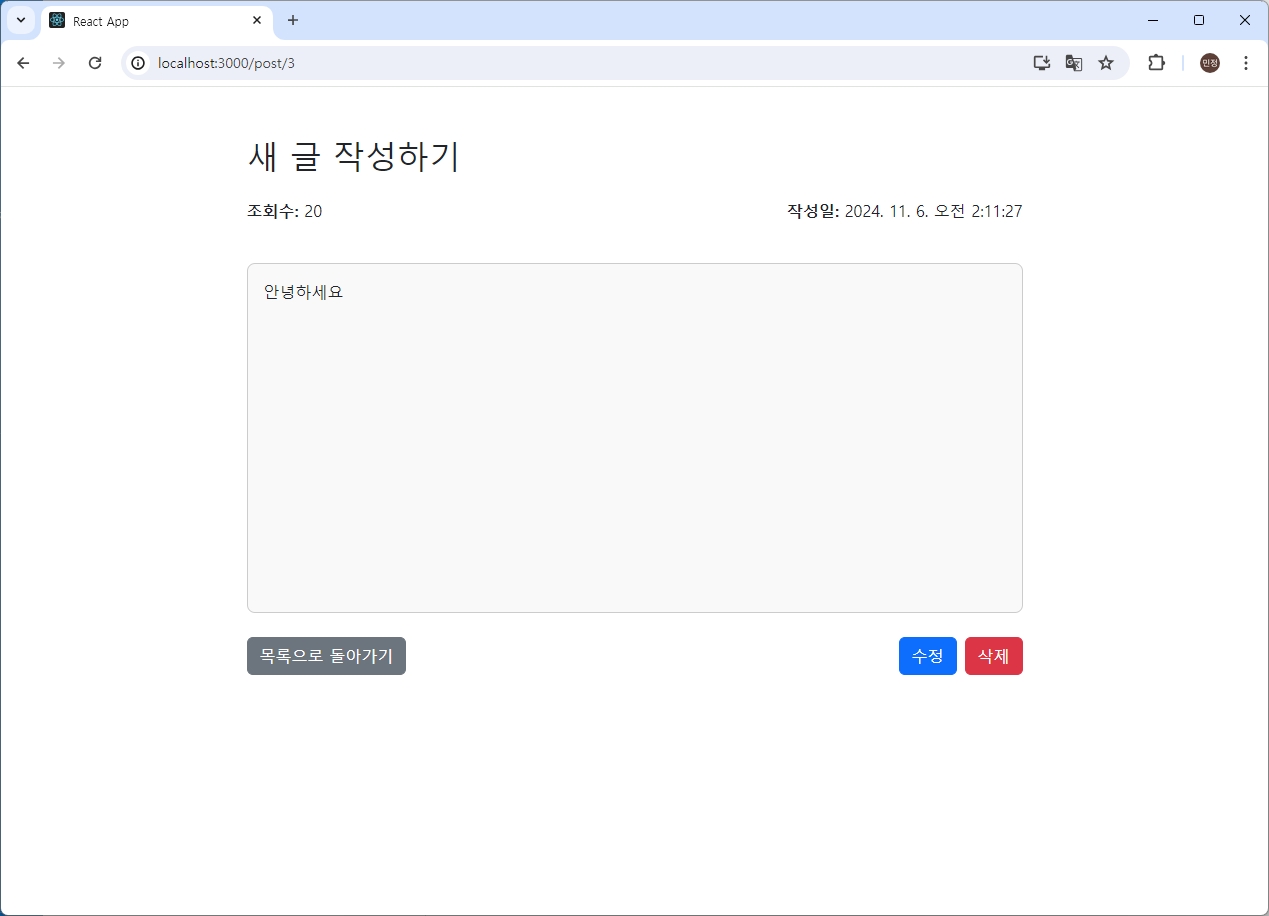
> postContent
현재 모습

수정 후 모습

▷조회수와 작성일 표시 :
<p>태그로 배치하고 강조 strong 스타일을 추가했다
<Row> 태그 내부에 두 개의 col을 사용해 수평정렬을 만들어줌
▷버튼 :
버튼 간 간격을 className="me-2"로 추가
d-flex justify-content-end 클래스를 사용해 버튼을 오른쪽 정렬
▷테두리 추가 :
<div> 태그를 post.content 주위에 추가하고 style 속성을 사용해 스타일을 적용해준다
▷반응형 레이아웃 :
Container와 Row를 활용해 반응형 디자인을 유지
md="6" 설정으로 화면 크기에 따라 레이아웃이 적응하도록 함

전체 코드 PostContent.js
//PostContent.js
import React, { useEffect, useState } from 'react';
import { useParams, useNavigate } from 'react-router-dom';
import { deletePost } from '../share/api';	//api.js에서 함수를 불러오기
import axios from 'axios';
import { Link } from 'react-router-dom';
import { Container, Row, Col, Button } from 'react-bootstrap';

const PostContent = () => {
	const { id } = useParams();
    const navigate = useNavigate();	//navigate 변수 선언
    const [post, setPost] = useState(null);

    useEffect(() => {
    //	게시글 데이터 가져오기
    console.log("### useEffect 실행됨");
    axios.get(`http://localhost:5001/api/posts/${id}`)
    	.then(response => {
        	setPost(response.data);

            //조회수 증가 API 호출
            console.log("### 조회수 증가 API 호출");
            axios.patch(`http://localhost:5001/api/posts/${id}/view`)
            	.catch(error => console.error('조회수 증가 오류:', error));
        })
        .catch(error => console.error('게시글 불러오기 오류:', error));
    }, [id]);

    if (!post) return <div>로딩 중...</div>;

    // 수정 함수
    const handleEdit = () => {
    // 수정 페이지로 이동하는 함수
    navigate('/edit/${id}');
    };

    // 삭제 함수
    const handleDelete = async () => {
    const result = await deletePost(id);

        if(result.success) {
			alert('Post deleted successfully');
            navigate('/');	//삭제 후 메인페이지로 이동
        } else {
			alert(result.error || 'Failed to delete post');
        }
    };


   return (
   	<Container style={{ maxWidth: '800px', marginTop: '50px' }}>
    	<h2 className="mb-4">{post.title}</h2>
        <Row className="mb-4">
        	{/* 조회수와 작성일을 같은 Row에 배치 */}
            <Col md="6">
            	<p>
                	<strong>조회수:</strong> {post.view_cnt}
                </p>
            </Col>
            <Col md="6" className="text-end">
            	<p>
                	<strong>작성일:</strong> {new Date(post.created_at).toLocaleString()}
                </p>
            </Col>
        </Row>
        <Row className="mb-3">
        	<Col>
            	{/* 내용에 테두리 추가 */}
            	<div
                style={{
                	border: '1px solid #ccc',	//테두리 색상
                	borderRadius: '8px',	//테두리 둥글게
                    padding: '16px',	// 내용과 테두리 간 간격
                    backgroundColor: '#f9f9f9',	//배경 색상
                    minHeight: '350px',	//최소 높이를 350px로 설정
                }}>
                    <p>{post.content}</p>
                </div>
            </Col>
        </Row>

        <Row className="mt-4">
        	{/* 목록으로 돌아가기 버튼을 하단 왼쪽에 배치 */}
            <Col md="6">
            	<Link  to="/">
                	<Button variant="secondary">목록으로 돌아가기</Button>
                </Link>
            </Col>

            <Col className="d-flex justify-content-end">
            	<Button variant="primary" className="me-2" onClick={handleEdit}>
                	수정
                </Button>
                <Button variant="danger" onClick={handleDelete}>
                	삭제
                </Button>
            </Col>
        </Row>
   	</Container>
   );
};

export default PostContent;
7-3. 게시판 글 수정 Bootstrap 적용
> postEdit
현재 모습

수정 후

▷마찬가지로 Container, Row, Col, Form, Button 컴포넌트 사용
▷제목과 내용 필드 :
Form.Label, Form.Control로 입력필드를 구성해 디자인
▷버튼 배치 :
저장과 취소 버튼을 동일한 Row와 Col 내에 배치하고 text-end 클래스를 사용해 오른쪽 정렬했다
className="me-2"를 사용해 버튼 간 여백을 만들어줬다
▷Col md={10} 설정으로 입력필드와 버튼의 너비를 조정하여 반응형 레이아웃을 유지
import React, { useEffect, useState } from 'react';
import { useParams, useNavigate } from 'react-router-dom';
import { editPost } from '../share/api';	//api.js에서 editPost 함수 불러오기
import axios from 'axios';
import { Container, Row, Col, Form, Button } from 'react-bootstrap';

const PostEdit = () => {
	const { id } = useParams();	//URL에서 post ID를 가져옴
    const navigate = useNavigate();	//navigate 사용
    const [title, setTitle] = useState('');
    const [content, setContent] = useState('');

    useEffect(() => {
    // 게시글 데이터를 가져와서 수정할 수 있도록 제목과 내용 상태에 저장
    axios
    	.get('http://localhost:5001/api/posts/${id}')	//템플릿 리터럴 수정
    	.then(response => {
        	setTitle(response.data.title);
            setContent(response.data.content);
        })
        .catch(error => console.error('게시글 불러오기 오류:', error));
    },[id]);

    const handleSave = async () => {
    	const updatedData = { title, content };

        try {
        	const result = await editPost(id, updatedData);

            if (result.success){
            	alert('Post updated successfully');
                navigate('/');	//수정 후 목록 페이지로 이동
            } else {
            	alert(result.error || 'Failed to update post');
            }
        } catch(error) {
        	console.error('### 게시글 수정 오류:', error);
            alert('Failed to update post');
        }
    };

    return (
    	<Container style={{ maxWidth: '800px', marginTop: '50px' }}>
        	<h2 className="mb-5">게시글 수정</h2>
            <Form>
            	{/* 제목 수정 */}
                <Row>
                	<Form.Label>제목</Form.Label>
                    <Col md={10}>
                    	<Form.Control
                        	type="text"
                            value={title}
                            onChange={(e) => setTitle(e.target.value)}
                            placeholder="제목을 입력하세요"
                        />
                    </Col>
                </Row>

                {/* 내용 수정 */}
                <Row className="mb-4 align-items-center">
                	<Form.Label>내용</Form.Label>
                    <Col me={10}>
                    	<Form.Control
                        	as="textarea"
                            rows={15}
                            value={content}
                            onChange={(e) => setContent(e.target.value)}
                            placeholder="내용을 입력하세요"
                        />
                    </Col>
                </Row>

                {/* 버튼 */}
                <Row className="mt-3">
                	<Col md={10} className="text-end">
                    	<Button variant="primary" onClick={handleSave} className="me-2">
                        	저장
                        </Button>
                        <Button variant="secondary" onClick={() => navigatte('/')}>
                        	취소
                        </Button>
                    </Col>
                </Row>
            </Form>
        </Container>
    );
};

export default PostEdit;
깃 업로드 완료
https://github.com/minjeong-j/REACT-NODE-APP
GitHub - minjeong-j/REACT-NODE-APP: React와 Nodejs 웹 애플리케이션
React와 Nodejs 웹 애플리케이션. Contribute to minjeong-j/REACT-NODE-APP development by creating an account on GitHub.
github.com
'프로젝트 기록 > React, Node.js를 이용한 게시판 만들기' 카테고리의 다른 글
| 4. 게시판 validation 만들기 - React와 Node.js 게시판 (0) | 2024.11.21 |
|---|---|
| 2. React와 Node.js를 사용한 게시판 웹 애플리케이션 만들기 - CRUD API 구현, 게시글 수정과 삭제 이벤트, Endpoint (6) | 2024.11.14 |
| 1. React와 Node.js를 사용한 게시판 웹 애플리케이션 만들기 - 게시판 만들기, 게시글 목록 자동 갱신, 글 추가, Router 설정, CORS 설정, MySQL (10) | 2024.11.06 |
| RESTful API 간단한 API 만들기, Postman 사용법 (1) | 2024.10.31 |
| React Context API로 전역 상태 관리 구현 (1) | 2024.10.30 |


